


Hi all
I am going to show you a simple example of how to use Hierarchical DataTemplates in a tree view for an easy display of hierarchical Data. The Example shows the links in a WebPage recursively. First we will create the data model that we want to show, note that we have two seperate models, one for the root element and one for the acctual data.
    public class WebPage
    {
        public string Href { get; set; }
        public string PageTitle { get; set; }
        public List<WebPage> LinksInPage { get; set; }
    }

    public class Root
    {
        public string Title { get; set; }
        public string Url { get; set; }
        public List<WebPage> WebPages { get; set; }
    }
We have to create a root object and the accrual data object as separate classes. the data template for each one will look like this:
        <HierarchicalDataTemplate DataType="{x:Type data:Root}"
                                  ItemsSource="{Binding Path=WebPages}">
            <Border BorderBrush="Black"
                    BorderThickness="2"
                    CornerRadius="10">
                <StackPanel>
                    <TextBlock Margin="10,0,0,0"
                               Text="{Binding Title}"></TextBlock>
                </StackPanel>
            </Border>
        </HierarchicalDataTemplate>

        <HierarchicalDataTemplate DataType="{x:Type data:WebPage}"
                                  ItemsSource="{Binding Path=LinksInPage}">
            <Border BorderBrush="Black"
                    BorderThickness="2"
                    CornerRadius="10">
                <StackPanel>
                    <TextBlock Margin="10,0,0,0"
                               Text="{Binding PageTitle}"></TextBlock>
                    <TextBlock Margin="10,0,0,0"
                               Text="{Binding Href}"></TextBlock>
                </StackPanel>
            </Border>
        </HierarchicalDataTemplate>
In the constructor of the window we will create the hierarchy of the data in code and provide the tree view with the DataContextpublic Window1()
{
InitializeComponent();
Root r = new Root();
r.WebPages = new List<WebPage>();
r.Title = "HomePage";
r.Url = @"http://www.HomePage.com";
WebPage link1 = new WebPage();
link1.Href = @"http://www.HomePage.com/link1";
link1.PageTitle = "link1";
r.WebPages.Add(link1);
WebPage Link2 = new WebPage();
Link2.Href = @"http://www.HomePage.com/Link2";
Link2.PageTitle = "Link2";
r.WebPages.Add(Link2);
WebPage Link3 = new WebPage();
Link3.Href = @"http://www.HomePage.com/Link2/Link3";
Link3.PageTitle = "Link3";
Link2.LinksInPage = new List<WebPage>();
Link2.LinksInPage.Add(Link3);
WebPage Link4 = new WebPage();
Link4.Href = @"http://www.HomePage.com/Link2/Link4";
Link4.PageTitle = "Link4";
Link2.LinksInPage.Add(Link4);
WebPage Link5 = new WebPage();
Link5.Href = @"http://www.HomePage.com/link1/Link5";
Link5.PageTitle = "Link5";
link1.LinksInPage = new List<WebPage>();
link1.LinksInPage.Add(Link5);
WebPage Link6 = new WebPage();
Link6.Href = @"http://www.HomePage.com/link2/Link3/Link6";
Link6.PageTitle = "Link6";
Link3.LinksInPage = new List<WebPage>();
Link3.LinksInPage.Add(Link6);
treeView1.DataContext = r;
}
To finish we will define the TreeView in Xaml:<Grid Background="LightSkyBlue">
<TreeView Margin="0,0,15,0" Name="treeView1" Background="LightSkyBlue">
<TreeViewItem ItemsSource="{Binding Path=WebPages}"
Header="{Binding Title}"></TreeViewItem>
</TreeView>
</Grid>
Notice that we provide the TreeView with one TreeViewItem, thats the root The result is this display:
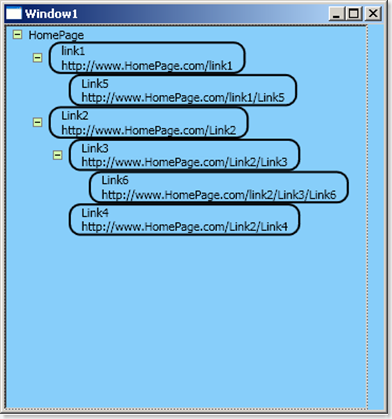
You can download the Source code here:
http://www.filefactory.com/file/2e5dfd/
EnjoyAmit


